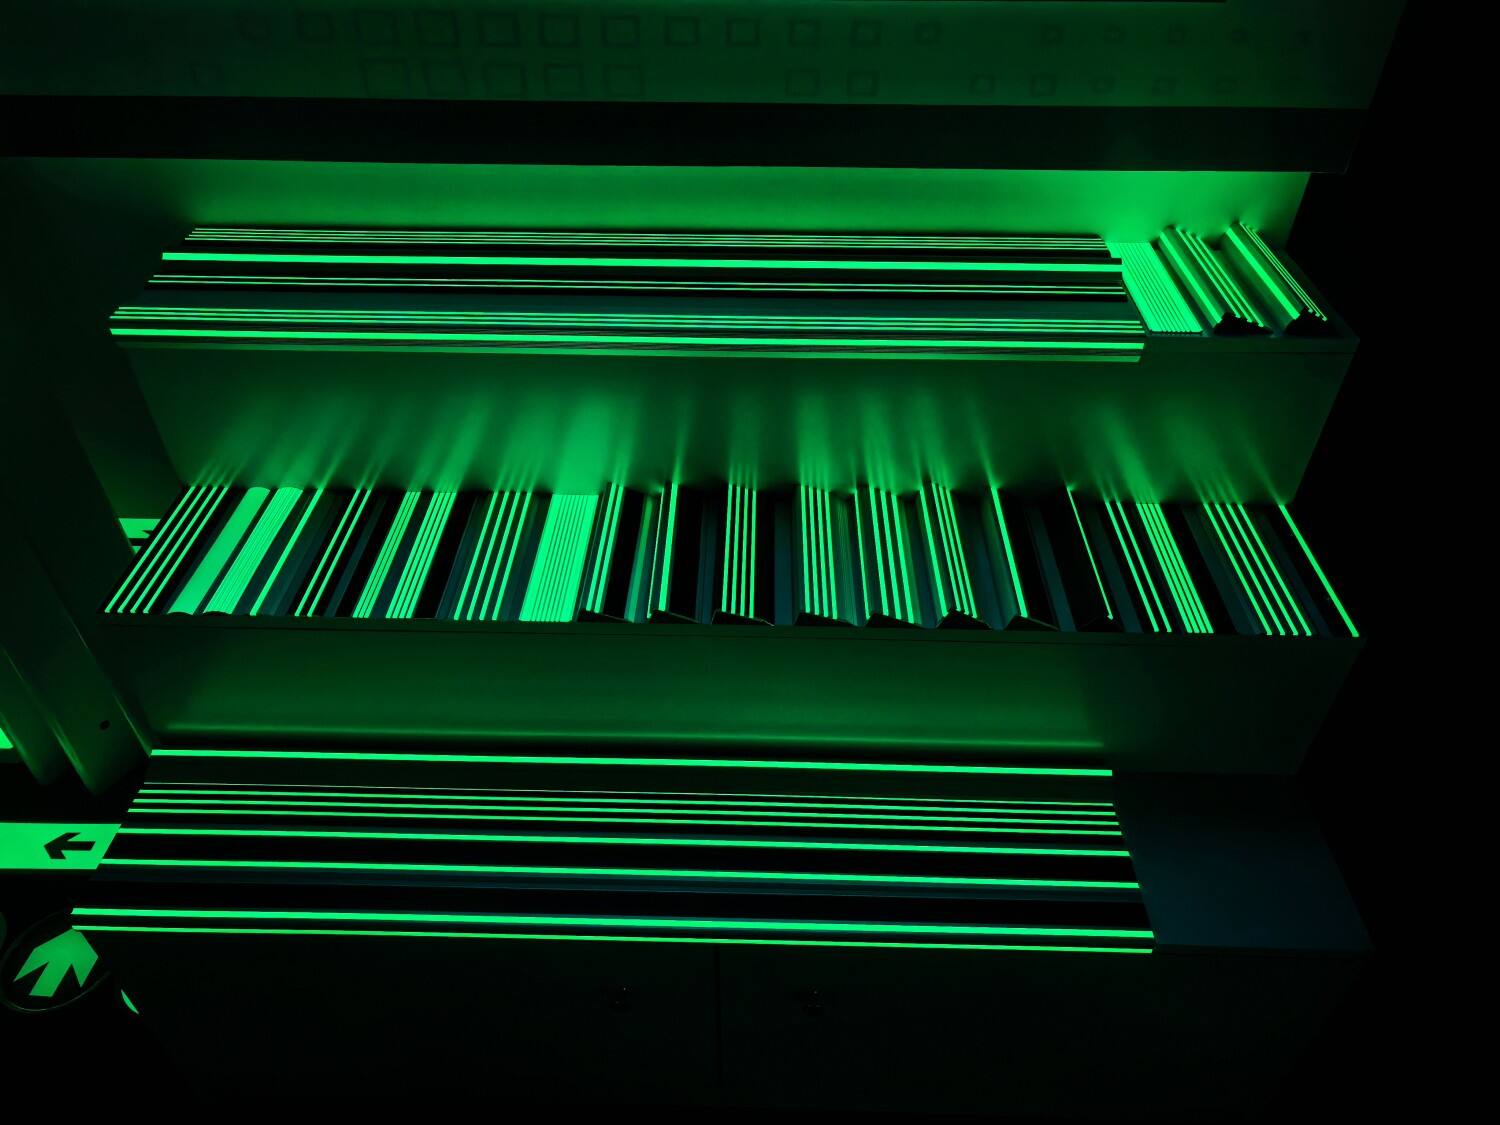
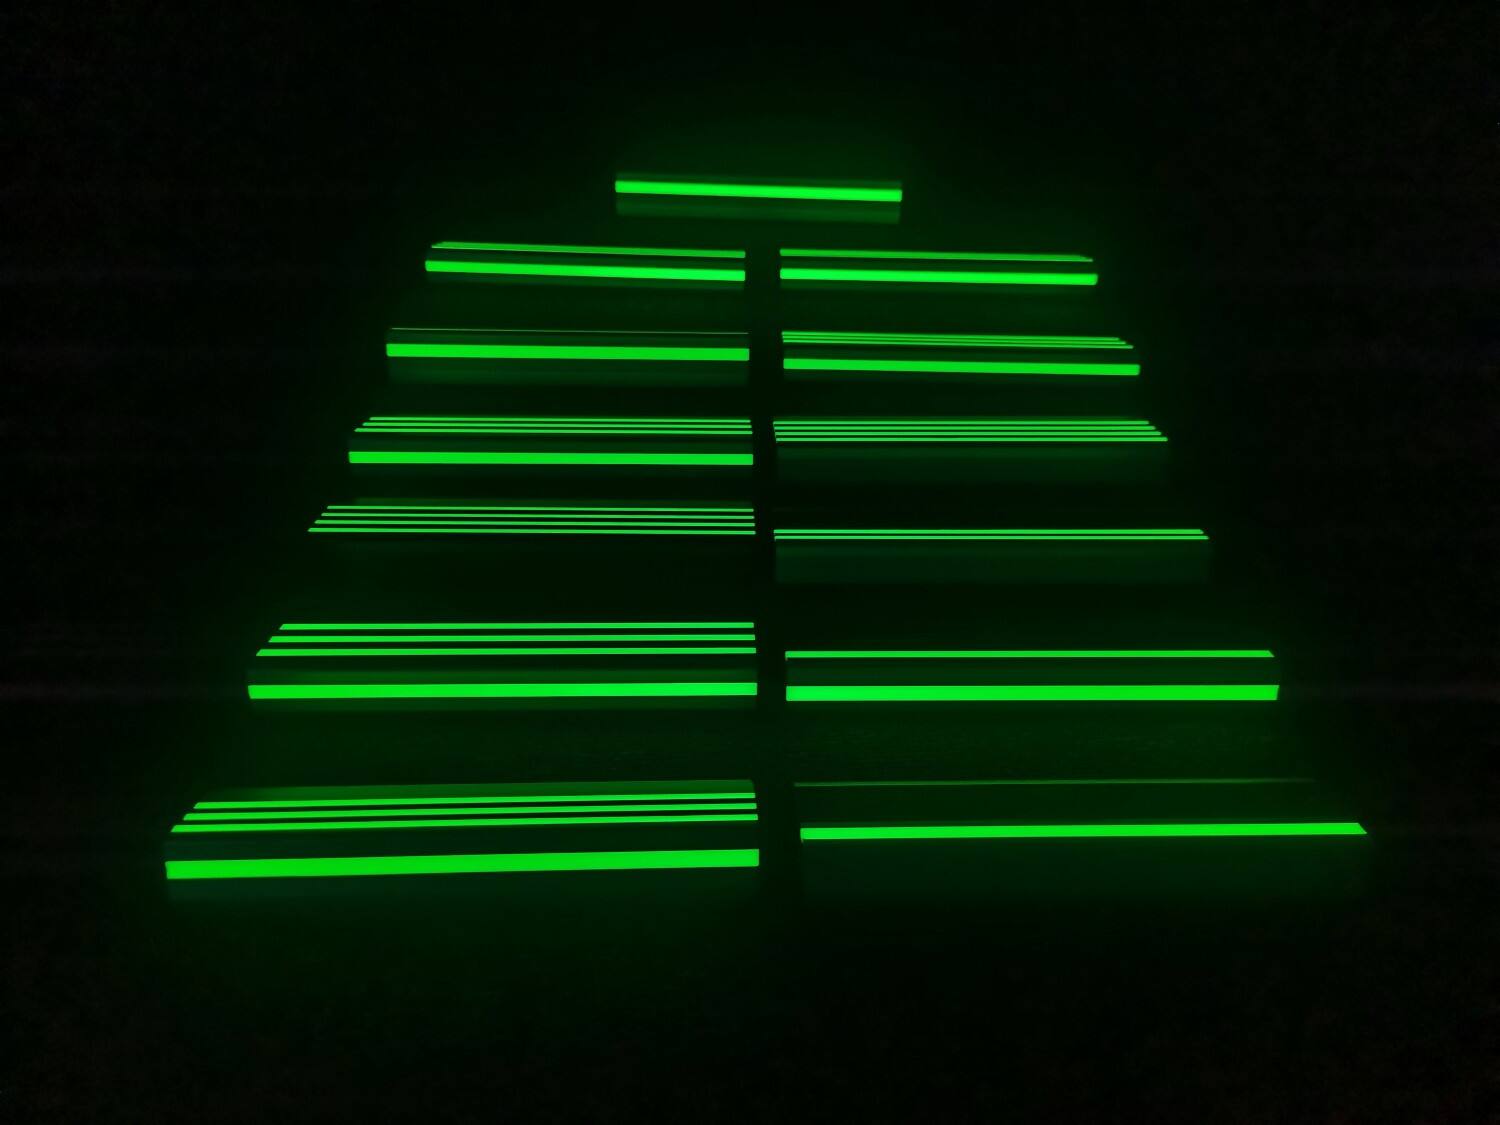
ที่หางโจว จวินถิง เราเข้าใจดีว่าความปลอดภัยเป็นสิ่งที่ไม่ควรถูกทำให้ลดทอนลง พื้นผิวที่ลื่นเป็นหนึ่งในสาเหตุหลักของการเกิดอุบัติเหตุทั้งในสภาพแวดล้อมที่พักอาศัยและเชิงพาณิชย์ โดยเฉพาะในพื้นที่เสี่ยงสูง เช่น บันได ทางลาด ห้องน้ำ บริเวณสระว่ายน้ำ ทางเดิน และสถานที่อุตสาหกรรม นี่คือเหตุผลที่เราพัฒนาแถบกันลื่นเรืองแสงขึ้นมา: ซึ่งเป็นทางแก้ปัญหาที่ใช้งานได้จริง ที่รวมเอาคุณสมบัติในการป้องกันการลื่น ความทนทาน ความต้านทานต่อสภาพอากาศ และการมองเห็นได้ในเวลากลางคืนไว้ด้วยกัน
แถบกันลื่นของเราได้รับการออกแบบให้ทำงานได้อย่างมีประสิทธิภาพในหลากหลายสภาพแวดล้อม พร้อมรักษาความสามารถในการยึดติดอย่างแข็งแรงและความทนทานระยะยาว อย่างไรก็ตาม แม้วัสดุที่ดีที่สุดก็ยังต้องการการติดตั้งและบำรุงรักษาอย่างเหมาะสมเพื่อให้บรรลุศักยภาพสูงสุด ด้วยประสบการณ์หลายปีของเราในด้านวัสดุเพื่อความปลอดภัยและผลิตภัณฑ์เรืองแสง เราจึงขอแบ่งปันเทคนิคการติดตั้งที่ใช้งานได้จริง คำแนะนำในการใช้งาน และข้อเสนอแนะในการบำรุงรักษา เพื่อช่วยให้ผู้ใช้สามารถยืดอายุการใช้งานของผลิตภัณฑ์ให้นานที่สุด และรับประกันประสิทธิภาพการกันลื่นที่เชื่อถือได้
การเตรียมพื้นผิวอย่างเหมาะสมเป็นหนึ่งในปัจจัยที่สำคัญที่สุดในการรับประกันความสำเร็จของการติดตั้ง การข้ามขั้นตอนการเตรียมพื้นผิวมักนำไปสู่การยึดติดที่ลดลง การยกตัวก่อนเวลาอันควร และอายุการใช้งานที่สั้นลง
การเตรียมผิว
• ก่อนการติดตั้ง ต้องทำความสะอาดพื้นผิวอย่างทั่วถึง โดยต้องกำจัดน้ำมัน ฝุ่น ความชื้น คราบสบู่ หรือเศษสิ่งสกปรกที่หลุดลอกออกให้หมดจากพื้นผิวที่จะติดตั้ง พื้นผิวที่ปนเปื้อนจะทำให้ความแข็งแรงของการยึดติดด้วยกาวลดลงอย่างมาก
• สำหรับพื้นผิวเรียบ เช่น กระเบื้องเซรามิก หินขัดเงา หรือหินอ่อน แนะนำให้ทำให้พื้นผิวหยาบขึ้นอย่างยิ่ง การขัดเบาๆ หรือการขัดด้วยกระดาษทรายสามารถช่วยเพิ่มการยึดเกาะได้ โดยการสร้างพื้นผิวที่มีความขรุขระเล็กน้อย เพื่อให้ยึดติดกันได้ดีขึ้น หลังจากทำให้พื้นผิวหยาบแล้ว ควรเช็ดทำความสะอาดพื้นผิวอีกครั้งเพื่อกำจัดฝุ่นละออง
• พื้นผิวก็ควรแห้งสนิท แบนเรียบ และมีความมั่นคงทางโครงสร้างอย่างสมบูรณ์ ก่อนเริ่มติดตั้ง
การวัดและตัดอย่างแม่นยำ
• วัดพื้นที่ที่จะติดตั้งอย่างรอบคอบก่อนตัดแถบกันลื่น ความแม่นยำมีความสำคัญอย่างยิ่ง โดยเฉพาะบริเวณบันได หรือจุดที่มองเห็นได้ชัดซึ่งมีผลต่อรูปลักษณ์โดยรวม
• ในการตัด ขอแนะนำให้ตัดแถบให้สั้นกว่าความยาวเต็มของพื้นผิวที่จะติดตั้งเล็กน้อย เพื่อรองรับการขยายตัวจากความร้อน และช่วยให้จัดตำแหน่งได้ง่ายขึ้น สำหรับมุมหรือบริเวณที่ต้องต่อกัน ให้ตัดเป็นมุม 45 องศา เพื่อให้ได้รอยต่อที่เรียบเนียนและดูเป็นมืออาชีพมากยิ่งขึ้น
• ช่องว่างระหว่างรอยต่อควรควบคุมให้อยู่ในระดับไม่เกิน 0.5 มม. เพื่อรักษาลักษณะที่เรียบเนียนไร้รอยต่อ และลดการสะสมของสิ่งสกปรก
ข้อกำหนดด้านสิ่งแวดล้อม
เงื่อนไขในการติดตั้งมีความสำคัญมากกว่าที่หลายคนเข้าใจ ซึ่งอุณหภูมิที่แนะนำสำหรับการติดตั้งอยู่ระหว่าง 10°C ถึง 30°C
หลีกเลี่ยงการติดตั้งในช่วงเวลาต่อไปนี้:
• สภาพอากาศฝนตก
• สภาพแวดล้อมที่มีความชื้นสูง
• อุณหภูมิร้อนจัด หรือได้รับแสงแดดโดยตรงเป็นเวลานาน
• อุณหภูมิต่ำจนเกิดการแข็งตัว (เยือกแข็ง) หรือใกล้จุดเยือกแข็ง
• สภาพแวดล้อมที่ไม่เอื้ออำนวยอาจส่งผลเสียต่อกระบวนการแข็งตัวของกาว และคุณภาพโดยรวมของการยึดติด
แถบกันลื่นของเราที่มีกาวในตัวหรือใช้กาวในการติดตั้งนั้นมีขั้นตอนการติดตั้งที่ค่อนข้างตรงไปตรงมา
ขั้นตอนที่ 1: การทำเครื่องหมายและจัดตำแหน่ง
• ใช้ตลับวัดและปากกาเมาร์กเกอร์เพื่อกำหนดเส้นอ้างอิงพื้นฐานบนพื้นผิวที่จะติดตั้ง เส้นนำทางเหล่านี้ช่วยให้มั่นใจว่าแถบกันลื่นจะถูกติดตั้งอย่างตรงและรักษาระยะห่างที่สม่ำเสมอจากขอบพื้นผิว
• สำหรับการติดตั้งบนบันได การจัดวางอย่างสม่ำเสมอมีความสำคัญยิ่งทั้งในด้านความสวยงามและความปลอดภัย
ขั้นตอนที่ 2: การทาสารยึดเกาะ
เพื่อผลลัพธ์ที่ดีที่สุด เราขอแนะนำให้ใช้:
• สารยึดเกาะโมดิฟายด์ซิเลนของ 3M หรือ
• สารยึดเกาะทั่วไปแบบแรงยึดเกาะสูง ที่ออกแบบมาเป็นพิเศษสำหรับการยึดวัสดุปูพื้น
ทาสารยึดเกาะอย่างสม่ำเสมอทั้งสองส่วน ได้แก่:
• ด้านหลังของแถบกันลื่น และ
• พื้นผิวที่เตรียมไว้แล้ว
ความหนาของกาวโดยทั่วไปไม่ควรเกิน 1 มม. ชั้นกาวที่หนาเกินไปอาจทำให้การแข็งตัวช้าลงและส่งผลให้การยึดติดไม่สม่ำเสมอ
ปล่อยให้ชั้นกาวระเหยบางส่วนจนแห้งพอที่จะมีความเหนียวเล็กน้อย แต่ไม่เปียกชื้น ตัวบ่งชี้ที่ดีคือเมื่อสัมผัสเบาๆ แล้วรู้สึกว่าแห้ง แต่ไม่ติดนิ้ว
เมื่อพร้อมแล้ว ให้จัดแนวแถบกาวอย่างระมัดระวังให้ตรงกับเส้นฐาน และติดลงบนพื้นผิว
ขั้นตอนที่ 3: การกดและตรึง
หลังจากวางตำแหน่งแล้ว ให้ใช้ค้อนยางเคาะเบาๆ จากศูนย์กลางออกสู่ปลายทั้งสองข้าง ซึ่งจะช่วย:
• กำจัดฟองอากาศที่ติดค้าง
• เพิ่มประสิทธิภาพการสัมผัสระหว่างพื้นผิวที่ยึดติด
• ประกันว่ากาวถ่ายโอนได้ครบถ้วน
เพื่อความมั่นคงเพิ่มเติมระหว่างกระบวนการแข็งตัว ให้ตรึงปลายทั้งสองข้างด้วยเทปกาวแบบปิดผิว (masking tape) หรือเทปกาวสำหรับทาสี (painter’s tape) เพื่อป้องกันการเคลื่อนตัวหรือขอบยกขึ้น
ขั้นตอนที่ 4: การแข็งตัวและการป้องกัน
หลังติดตั้ง ให้ปล่อยให้กาวแห้งตัวตามธรรมชาติที่อุณหภูมิห้องเป็นเวลาอย่างน้อย 24 ชั่วโมง
ในช่วงเวลาการแห้งตัวนี้:
• ห้ามมีผู้คนเดินผ่านบริเวณดังกล่าว
• ห้ามสัมผัสกับน้ำ
• ห้ามทำความสะอาดหรือล้างพื้นผิว
• ห้ามกระทำแรงกระแทกจากภายนอก หรือลากวัตถุใดๆ ผ่านบริเวณดังกล่าว
• การให้ผู้คนเดินผ่านก่อนเวลาที่กำหนด เป็นหนึ่งในสาเหตุที่พบบ่อยที่สุดของการติดตั้งล้มเหลว
เลือกผลิตภัณฑ์ให้เหมาะสมกับสภาพแวดล้อม
สภาพแวดล้อมที่แตกต่างกันต้องการโซลูชันป้องกันการลื่นที่แตกต่างกัน
สำหรับพื้นที่เปียกหรือมีความชื้นสูง เช่น:
• ห้องน้ำ
• บริเวณรอบสระว่ายน้ำ
• ห้องแต่งตัว
• ห้องครัว
เราขอแนะนำให้ใช้กาวชนิดกันน้ำที่ออกแบบมาโดยเฉพาะเพื่อทนต่อความชื้น
สำหรับบันได การติดตั้งแถบกันลื่นตามขอบหน้าบันไดจะให้ประโยชน์สองด้าน คือ:
• การป้องกันการลื่นไถล
• การป้องกันขอบบันไดจากการสึกหรอและกระเทาะ
วิธีนี้มีประโยชน์อย่างยิ่งในอาคารสาธารณะหรือพื้นที่เชิงพาณิชย์ที่มีผู้ใช้งานหนาแน่น
การทำความสะอาดประจำ
การทำความสะอาดเป็นประจำจะช่วยรักษาทั้งลักษณะภายนอกและความสามารถในการใช้งานไว้
การใช้งาน:
• สารทำความสะอาดที่มีค่า pH เป็นกลาง
• ผ้าหรือแปรงนุ่ม
หลีกเลี่ยง:
• กรดเข้มข้น
• เบสเข้มข้น
• ตัวทำละลายที่รุนแรง
สารเคมีรุนแรงสามารถทำลายทั้งอนุภาคกันลื่นและชั้นเรืองแสงได้
นอกจากนี้ การกำจัดสิ่งสกปรกและเศษสิ่งสกปรกบริเวณขอบและรอยต่ออย่างเป็นระยะยังช่วยรักษาประสิทธิภาพในการสร้างแรงเสียดทานอีกด้วย
การบำรุงรักษาประสิทธิภาพในเวลากลางคืน
สำหรับรุ่นเรืองแสง ความสะอาดมีความสำคัญเป็นพิเศษ เพราะฝุ่นที่สะสมจะลดประสิทธิภาพในการดูดซับแสง ซึ่งอาจทำให้ความสามารถในการเรืองแสงในเวลากลางคืนลดลง
การเช็ดอย่างสม่ำเสมอช่วยให้:
• การชาร์จที่ดีขึ้นภายใต้แสงแวดล้อม
• ความมองเห็นในเวลากลางคืนที่ดีขึ้น
• ประสิทธิภาพการให้คำแนะนำในกรณีฉุกเฉินที่ดีขึ้น
แม้แต่ผลิตภัณฑ์ที่ทนทานก็จำเป็นต้องได้รับการตรวจสอบตามระยะเวลา ขอแนะนำให้ดำเนินการตรวจสอบทุกหกเดือน
ตรวจสอบว่า:
• ขอบยกตัวขึ้น
• สารยึดติดเสื่อมสภาพ
• การสึกหรอของอนุภาคอย่างรุนแรง
• รอยแตกร้าวหรือความเสียหายบนพื้นผิว
หากเกิดการยกตัวขึ้นเล็กน้อย ควรทาสารยึดติดใหม่ทันทีก่อนที่ปัญหาจะรุนแรงขึ้น หากการสึกหรอหนักมาก หรืออนุภาคกันลื่นเสื่อมสภาพอย่างมีนัยสำคัญ แนะนำให้เปลี่ยนชิ้นส่วนเพื่อรักษามาตรฐานความปลอดภัย
การบำรุงรักษาเชิงป้องกันมีค่าใช้จ่ายน้อยกว่าการรอให้อุปกรณ์เสียหายอย่างสมบูรณ์มาก
ตลอดหลายปีที่ผ่านมา เราพบข้อผิดพลาดซ้ำๆ หลายประการที่ทำให้อายุการใช้งานของผลิตภัณฑ์สั้นลง
การติดตั้งบนพื้นผิวที่เปียก
• ห้ามติดแถบกันลื่นลงบนพื้นผิวที่ชื้นหรือเปียกเด็ดขาด
• ความชื้นที่ถูกกักเก็บไว้ใต้ชั้นกาวมักก่อให้เกิด:
1. การยึดเกาะที่อ่อนแอ
2. การเกิดฟอง
3. การหลุดออกก่อนกำหนด
โปรดตรวจสอบให้แน่ใจเสมอว่าพื้นผิวแห้งสนิทแล้ว
การขัดพื้นผิวมากเกินไป
แม้ว่าการขัดพื้นผิวเรียบให้หยาบขึ้นจะเป็นสิ่งที่แนะนำ แต่การขัดอย่างรุนแรงเกินไปอาจทำให้พื้นผิวไม่เรียบเสมอกัน หรือทำลายความสมบูรณ์ของพื้นผิวได้ การใช้ความเหมาะสมคือหัวใจสำคัญ
การผสมวัสดุแถบกันลื่นชนิดต่าง ๆ กัน
หลีกเลี่ยงการผสมวัสดุแถบกันลื่นชนิดต่าง ๆ กันภายในพื้นที่ติดตั้งเดียวกัน เนื่องจากวัสดุแต่ละชนิดมีอัตราการขยายตัวและหดตัวที่แตกต่างกันภายใต้การเปลี่ยนแปลงอุณหภูมิ ซึ่งอาจก่อให้เกิด:
• ขอบยกตัวขึ้น
• การบิดงอ
• การแยกตัวของรอยต่อ
ความสม่ำเสมอช่วยเพิ่มเสถียรภาพในระยะยาว
ที่หางโจว จวินติง เราออกแบบแถบกันลื่นแบบเรืองแสงเพื่อให้ทั้งความปลอดภัยและประสิทธิภาพในการใช้งานระยะยาว เมื่อติดตั้งและบำรุงรักษาอย่างเหมาะสม แถบเหล่านี้จะให้ความต้านทานที่ยอดเยี่ยมต่อการสึกหรอ สภาพอากาศ ความชื้น และอันตรายจากการลื่นไถล พร้อมทั้งเพิ่มความมองเห็นในสภาพแวดล้อมที่มีแสงน้อย
การใส่ใจเป็นพิเศษเล็กน้อยระหว่างการติดตั้งและการบำรุงรักษา สามารถยืดอายุการใช้งานได้อย่างมีนัยสำคัญ และรักษาประสิทธิภาพการกันลื่นไว้ได้นานหลายปี
หากคุณกำลังวางแผนโครงการที่เกี่ยวข้องกับบันได ทางลาด ห้องน้ำ ทางเดิน พื้นโรงงาน หรือเส้นทางความปลอดภัยสาธารณะ ทีมงานของเราพร้อมให้คำแนะนำด้านเทคนิคและแนะนำผลิตภัณฑ์ที่เหมาะสมกับความต้องการเฉพาะของงานคุณเสมอ ความปลอดภัยเริ่มต้นจากรายละเอียด และการใส่ใจในรายละเอียดเหล่านั้นอย่างถูกต้องคือสิ่งที่ทำให้ทุกอย่างแตกต่าง

ห้อง 815 และ 816 อาคาร 2 ศูนย์การค้าตงฟางเหมา หางโจว เจ้อเจียง
ลิขสิทธิ์ © 2026 บริษัท Hangzhou Junting Luminescence Technology Co., Ltd. ทั้งหมดสงวนสิทธิ์